[ad_1]
The Buttons on the Nikon D3400 are particularly useful because they allow you to get into the inner workings of the camera fairly easily. Whilst the Mode Dial is a useful short cut to se the camera to shoot in specific styles, if you want more control over your pictures or video, you will need to understand the buttons.
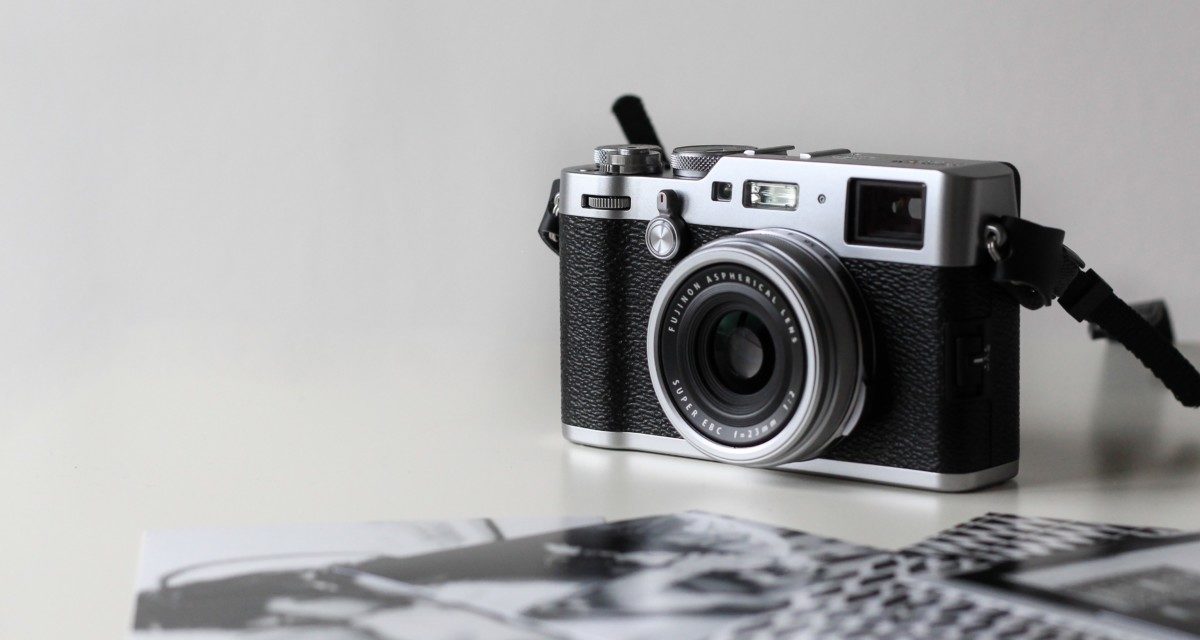
On the top of the Nikon D3400 the first thing there to look at is the ON/OFF switch. You can see that that rotates either clockwise or anti-clockwise. Within that switch is the shutter button and this is what you press to take the picture. The next large thing on the top of the camera is the MODE DIAL. This is really important because it is the thing that you are going to turn to most of all – particularly in the early stages of your photography with this camera but pretty much all the way through. The MODE DIAL will tell the Nikon D3400 what mode you want to use to take the picture, and the mode in this sense means what style of picture or the circumstances in which you are photographing so that the camera itself can change the settings and the parameters to take the picture with the best exposure. Unless you are in M for manual, in all the other modes the camera will decide the best exposure for you and that's very important to remember. The reason that you change modes is because you may be wanting to take a different type of picture, in which case the parameters ought to change too. So, for example, if you want to take a portrait then the Nikon D3400 will change the settings so that it can best take a portrait type picture; if you want to take a sports picture then the sports mode will change the settings so that you can take a better sports picture and that's what these modes do. M,A,S and P are the manual and semi-automatic modes, which give you more control over the basic variables – ISO, shutter speed and aperture. Just to give you a brief idea of how these modes M, A, S, P work; they are the modes in which you, as the photographer, have the most control and they are the ones which ultimately you would be hoping to use more often as you get more experienced.
However, The one you will probably start on is the green AUTO MODE and that will set the parameters of the camera to take the picture that will give you the best exposure and, if required, it will set off the flash. If you are in a situation where you do not want the flash, then you use the mode beneath that which is AUTO WITHOUT FLASH and that is ideal for places like libraries or museums where they do not want flash photography. Again the Nikon D3400 will get the best exposure it can with the circumstances that it is given in terms of light etc. Underneath that is PORTRAIT MODE then LANDSCAPE MODE then CHILD MODE then SPORTS MODE then MACRO MODE which is very good for close-up photography which is why it is indicated by a flower, NIGHT TIME PORTRAIT.
If we go to the other buttons on the top of the camera then the one with the red dot is the VIDEO off and on button and the one across from that with the plus and the minus is the EXPOSURE COMPENSATION BUTTON. This button allows you to change the exposure in any of the modes here, except for the manual mode. So if you think it's a little dark or a little bit too bright then you can use this button to either underexpose or over the overexpose the picture slightly and that gives you a little control over the auto settings and the auto modes so it's a very useful one to have. The INFO BUTTON has two purposes – if you are looking through the viewfinder, then on the back screen the various details of what you have got in terms of aperture and shutter speed etc. are available here. They will show here if you press the info button when you are looking through the viewfinder then it will switch that back screen off. Now that can be quite useful because the back screen does drain the battery somewhat, so it is a useful thing to have if you are going to be shooting all day and you do not necessarily need to see what is on the back screen. If you are in Liveview which means that you are looking through the camera and looking through to the subject through the back screen, then the INFO BUTTON gives you a lot more information around that screen telling you the information you need to know, whether you're shooting either stills or video, and so it is a very useful button for that. Also on the top is the hotshoe. It is called the hot shoe because it has electrical connectivity going through it. If it did not it would be called the cold shoe. This hot shoe is designed primarily for a flash. It is either a flash gun or an off-camera flash. They are essentially both the same but if you put a flash gun on here – a type that shoots TTL (which is Through The Lens) then the flash gun will talk to the camera and that means that it dedicates itself to the camera. So, in other words, the camera will give it information that it automatically picks up anyway to set its own exposure. It will tell it the distance that the subject is away from the camera and it will give it the lighting conditions and as a consequence of that, the flash will set itself to get the best exposure. So it is a very useful thing to have and also with regards to the camera flash here.
OK, now let us take a look at the back of the Nikon D3400. At the very top is the viewfinder and that is what DSLR photographers traditionally look through when they are trying to compose and take their pictures. At the top corner here is the diopter or the DIOPTRIC ADJUSTER and this is for people who do not have 20/20 vision and who need to adjust the focus of the viewfinder to match their eyesight. Bear in mind that it will not actually change the focusing mechanism of the camera, it is purely just so that when you look through the viewfinder you see things as sharp when the camera sees them as sharp. The way you check this is by looking through the camera when it is on autofocus and focusing on something and then turning the adjuster until it also looks sharp to you.
Just to the right of the viewfinder is a very useful button. It is the AE lock or AF lock – auto exposure or auto focus locks. Now, by setting this button, which you can do in the menus you can set it to either lock the AUTO EXPOSURE or lock the AUTO FOCUS and that can be quite useful. If you focused on your subject in the middle of the frame and you just want to move the subject left or right – off center – then you can press the auto focus lock and the Nikon D3400 will maintain that same focus and allow you to move the lens slightly left or right to move the subject left or right of the frame without refocusing. Likewise, the AUTO EXPOSURE LOCK means that if you want to set the exposure of the frame and then move the Nikon D3400 so that it's shooting in what would be a different light and therefore require a different exposure then the camera won't reset the exposure and you can shoot the original exposure. There are reasons why you might do that for example if you were taking a picture of somebody against a bright sky and you don't want to use the flash then you could use the exposure lock by exposing the camera for the subject light rather than for the light of the sky and so the exposure of the picture will be set to the subject rather than the sky is that background. So there are reasons why you would want to do that and it is a very useful button to have. If you are in playback menu then by pressing the AE or AF lock button then you protect the picture that you are looking at, or the video that you are looking at which is also useful feature.
Next to that is the MAIN DIAL. This is used primarily for navigation. It allows you to move either across when you are choosing different selections of, say, white balance or auto exposures and it also allows you to navigate across other elements of the menu. There are two ways of navigating through the menu. The other is the Multi-Selector which is below that with the OK in the middle and that allows you to go up and down as well. It is actually more useful in most cases for navigation, but the rotate dial is also very useful in certain circumstances. Now the button that is between the main dial and the multi-selector is the LV button. If you press the LV button you will hear the mirror slot up and what that means is that the light coming in through the lens is coming straight through to the back screen – not being bounced up to the viewfinder. With this camera you can only use the viewfinder OR the Liveview screen. You can not use them both at the same time. The Liveview screen is actually very useful for composition and for understanding the sort of picture you are taking and you have to use live view when you are shooting video. So that is what the LV button does – it changes between the viewfinder and the live view screen at the back. If we look at the two buttons beneath the multi-selector which we have discussed then the first one is the DELETE BUTTON which is signified by the waste bin. This operates when you are in playback mode. When you are in playback mode on the Nikon D3400 and you see a picture or a video that you no longer want, if you press that delete button it will first ask you if you are sure you want to delete it and then if you press it again it will delete it.
Next to the delete button is the SHUTTER CONTROL BUTTON. Now it is not the shutter release button, which is on the top and allows you to take the picture, but the shutter control button gives you the options for when you press that shutter button. So, for example, the first option is single frame which means that you press the shutter button once and you take one picture. The next one is continuous which means that if you press the shutter button then you will take five frames per second probably up to four or five seconds before it has to start to buffer which means of course up to 20 or 25 frames. The one after that is the quiet shutter release. Then, after that, you get on to the self timers. The self timer can be very useful because if you want to take a picture of a group and be in that group, then you can set it on to the initial one which is ten seconds and then you can press the shutter button and then run round to the front and be in that picture, which is very useful. The next two are with connection to the remote control the infrared remote control which you can buy as an accessory to this camera and it allows you to set the shutter and to release the shutter by remote control using infrared. It has a two-second delay and it has an instant shutter release. The two-second delay makes sense of course because you do not want to be photographed if you are going to be in the group holding the shutter release infrared light. So it gives you two seconds to put your hand down. The instant one is if you are away from the camera but you have infrared connection to it and it means that you can fire that shutter release straight away.
The buttons on the left hand side of the camera are really very useful and quite powerful. The one at the very top is the PLAYBACK BUTTON and that allows you to see the pictures or the videos that you have taken. So by pressing that button and then using the multi-selector to navigate your way through, you can see either the stills or the videos that you have taken and by looking at the magnifying glasses which are just below the MENU BUTTON either the plus or the minus, if you find a still image that you want to examine more closely then you can use the plus to go into that and look at it more closely or to come out of it again you can use the minus magnifying glass. With the minus magnifying glass you can look at multi images on the back as well so if you press that when it is a full frame then you will get four images and then you will get nine and then you will get even more if you press it on more time, and that gives you an idea of how many pictures you have taken and if you wish, I guess the sort of progress that you are making in terms of the images that you are taking if you're doing a specific shoot, or you are trying to take a picture of something in particular. The one we missed out there is the MENU BUTTON and that really is important because that allows you access to the menus. Now the one criticism that I would aim at Nikon here is that they have not given us enough menus. we have essentially got four. We have got a PLAYBACK MENU, a SHOOTING MENU, a SETUP MENU and a RETOUCH MENU and then the one below that is just a RECENT SETTINGS MENU. So we have essentially four menus with an enormous number of selections in each of them. That means that it can be quite difficult to find what you are looking for and I would either say this is a criticism I have of this camera. There are other cameras out there which have more menus with fewer subcategories and navigating through them is a lot more simple, but this is what we have got and we shall go through the menus in a different video.
If we go down again to the magnifying glass we also have next to it a question mark and that is also very useful because if we get to a point where we are looking at one of the options in the camera and the question mark pops up at the bottom of the screen, then by pressing this button we get a brief guide as to what it is we have selected. The final button here is the i button and it is very useful because it gives you quick access to the settings that you can change when you want to take a picture. Please remember that if you are in one of the manual modes M, A, S, P, then you have access to – and are able to change – more settings than if you are in an automatic mode, because the automatic mode makes many of those selections for you and you do not have the ability to change them.
On the left hand side you have got two sockets, one for USB and one for an HDMI lead. The USB allows you to connect your camera to a computer and transfer your pictures across and the HDMI lead socket here allows you to connect your camera to a TV in order for you to see your pictures or your videos on a television. You do not get either of these leads in the box so you would have to buy them, but they are useful ways of connecting to other devices and particularly with the USB lead if you want to transfer your pictures onto a computer without having to take your card out and have a card reader. On the other side you have the card socket and this is where your SD card goes. it is a full size SD. On the bottom is the door for the battery compartment to allow you to place the battery. The only other thing on the bottom is the socket which allows you to attach the camera to a tripod. It is a standard fit – if you buy a tripod for a DSLR it will fit this camera so there is no need to worry about that.
Now let us take a look at the front of the Nikon D3400. The first thing we see is the infrared receiver and when I mentioned using the infrared shutter button the ML-L3 then that is the receiver for that infrared signal. You do not notice it usually. The second thing to look at here is the redeye reduction lamp and that is very useful when you have the flash operating because sometimes when you photograph people the light bounces directly out of their eyes and creates a red-eye effect. This light will flash an instant before the flash goes off and will cause the pupils to contract and therefore reduce the possibility of redeye. It is also the self timer indicator so if you have got the camera set to self timer then this will flash to indicate that it is on properly, and finally it can also operate as the auto focus assist illuminator which means that if the camera is trying to focus on something in very poor light or focus on something that's got very little contrast then the light will go off to help it focus better. Then, going around to the other side of the camera then the first thing to look at here is the lens release button and obviously you need to press that button in order to release the lens. Above that and above the badge for the D3400 those three little indents there, they are the internal microphone. It operates reasonably well over a short distance, but just remember if you are videoing not to put your fingers over that.
Then we get onto to quite interesting buttons they are the FUNCTION BUTTON and the FLASH BUTTON. The function button allows you to select specific functions which you can change by pressing that button so you can change image quality and size, ISO, white balance or active d-lighting. Personally I would change that to ISO and the reason I would do that is because it is very useful when you are shooting video. The button above that is the flash mode button and if you press it then it will pop up the flash and allow you to use the flash even if the setting or the mode you are on doesn't think you need it and that can be useful when you want to use fill-in flash at a time or a point where the Nikon D3400 does not actually think you require it. But that is not all, because if you've popped up the flash then if you press this button again then it will give you options for the flash mode. Now there is a video on flash and flash guns so I am not going to go into much detail here but the flash modes on offer here are fill-in flash, red eye reduction, slow sync with red eye, slow sync rear curtain and slow sync and then back to fill-in flash. That is a really useful way of changing the purpose of the flash very quickly. But again that is not all because if you press the flash button and the exposure button which we have mentioned already then you get to change the flash compensation by using the main dial again at the back. You can increase the flash compensation by one stop or you can reduce it down by three stops and that is very useful if you have taken a picture with the flash and you think it is either a little too bright or a little too dark. So by using those two buttons in combination you can actually change the flash compensation very easily and very quickly.
[ad_2]
Source by Jeremy Bayston